There is something undeniably charming about a room where the lower half of the wall has been given special attention. Half wall molding, often called wainscoting or dado rail treatment, creates a natural division that anchors a room and protects walls from the bumps and scuffs of daily life. The concept is simple: molding covers the bottom portion of the wall, typically stopping somewhere between thirty and forty-eight inches from the floor, leaving the upper wall free for paint, wallpaper, or artwork. A pre-cut half wall molding kit takes this classic look and makes it accessible to anyone who can measure and level. Because every piece arrives already cut to length or clearly marked for simple adjustments, the installation focuses entirely on placement and attachment rather than wrestling with saws and angle finders. The result is an elegant, finished look that makes living rooms feel cozier, dining rooms feel more formal, and hallways feel intentionally designed rather than merely traversed.
Why Half Wall Treatment Creates Such a Strong Design Statement
Full wall molding can sometimes feel overwhelming, especially in smaller rooms where every surface competes for attention. Half wall molding solves this problem by creating a clear visual hierarchy. The lower section becomes the foundation, grounding the room and providing a consistent visual base below the furniture line. The upper section remains open and airy, drawing the eye upward and making ceilings feel higher than they actually are. This split creates natural opportunities for color play as well. Many designers paint the lower molding and wall in a darker, richer shade while keeping the upper wall light and bright. The contrast defines the room without closing it in. In spaces with existing architectural quirks like radiators or uneven floors, half wall molding is also wonderfully forgiving. The lower section hides imperfections below a certain height, while the crisp top edge of the molding provides a straight reference line that makes everything above it look intentional and correct.
What Arrives Inside a Pre-Cut Half Wall Kit
Opening a pre-cut half wall molding kit reveals a carefully organized set of components designed to work together seamlessly. The most visible pieces are the vertical stiles and horizontal rails that form the framework of your wainscoting pattern. These arrive cut to consistent lengths, often with factory-squared ends that eliminate the need for complex miter cuts. Many kits include pre-cut panel inserts as well, which are the flat or raised sections that sit inside the frame created by the stiles and rails. For simpler installations, the kit may consist only of the stiles and rails arranged in a grid pattern directly against the wall. The top piece, called the chair rail or cap molding, is usually included as a separate component that runs continuously across the top of the entire installation, providing a finished edge where the molding meets the upper wall. Some kits also include a bottom rail that sits just above the baseboard, creating a complete frame from floor to chair rail. Every piece is typically labeled or color-coded to match an assembly diagram, so you always know which piece goes where.
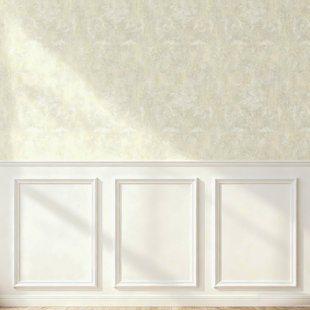
Choosing the Right Height for Your Room
The question of how high to run your half wall molding is not arbitrary, and getting it right dramatically affects how the finished room feels. For rooms with standard eight-foot ceilings, the traditional height falls between thirty-two and thirty-six inches from the floor. This places the top edge of the molding just above the typical height of chair backs, which is where the historical term chair rail comes from. For rooms with nine-foot ceilings, consider going higher, between forty-two and forty-eight inches. This taller proportion feels more substantial and prevents the molding from looking like a low afterthought. In rooms with very high ceilings, some designers run the half wall treatment up to fifty-four inches, creating a dramatic zone of texture that still leaves plenty of open wall above. The most important rule is consistency throughout your home or at least within visually connected spaces. A hallway with thirty-two inch molding that opens into a living room with forty-eight inch molding will feel disjointed. Choose one height and commit to it across the project.
Preparing the Wall Surface and Marking Layout
Before any molding touches your wall, spend time preparing the surface and marking your layout with precision. Remove any existing baseboard if your kit includes its own bottom rail, or plan to work with the existing baseboard if the kit is designed to sit above it. Clean the wall thoroughly to remove dust and grease, then patch and sand any holes or cracks in the lower section. Using a long level, mark a horizontal line around the entire room at your chosen chair rail height. This line must be perfectly level even if your floor is not, because the eye will notice a crooked cap rail far more than it will notice a gap at the floor that gets covered by baseboard. Next, mark the locations of your vertical stiles, spacing them evenly according to your kit’s layout guide. Use painter’s tape to mock up the entire grid on the wall, then step back and live with the tape lines for an hour. Adjust spacing as needed until the rhythm feels balanced. This tape rehearsal costs nothing but saves you from committing to a layout that feels wrong after the adhesive has dried.
Installing the Framework Before the Details
The assembly sequence for half wall molding follows a logical pattern that builds stability as you go. Start by installing the bottom rail or working with your existing baseboard, ensuring it is level and securely attached. Next, install the vertical stiles, positioning each one over your pencil marks and checking for plumb with a level before fastening. Space the stiles evenly, using the spacers provided in your kit to maintain consistent gaps. Once all stiles are in place, install the horizontal rails that run between them, creating the individual frames. Each rail should fit snugly between two stiles, with ends that are either square or pre-mitered depending on your kit’s design. Finally, install the chair rail or cap molding across the top of the entire assembly, running continuously from corner to corner. This top piece ties everything together visually and provides a straight edge where the lower molding meets the upper wall. Use construction adhesive on the back of every piece, reinforced with finish nails driven into studs wherever possible.
Finishing Touches for a Seamless Elegant Look
The difference between a half wall installation that looks good and one that looks elegant is almost always in the finishing details. After all pieces are installed, fill every nail hole with lightweight spackle, overfilling slightly to account for shrinkage. Once the spackle is dry, sand it smooth with a fine-grit sponge. Run a thin bead of paintable latex caulk along every seam where molding pieces meet each other, as well as along the top and bottom edges where the molding meets the wall. Smooth each bead with a damp fingertip, wiping away excess with a wet rag. This caulking step is what creates the illusion that the molding grew out of the wall rather than being attached to it. After the caulk dries, prime the entire installation with a high-adhesion primer, paying special attention to any raw ends or filled areas. Finally, apply two thin coats of your chosen paint color. For a classic elegant look, paint the lower wall and the molding the same color but use a semi-gloss or satin sheen on the molding while keeping the wall in eggshell. The subtle sheen difference adds depth without contrast.